"Thoughts from the Mound" Cover Design Process
tftm_cvr_side.png

I was honored last year when Michael Whitworth approached me about a special book he was putting together called Thoughts From The Mound, a collection of writings by Jeff Jenkins. I was thrilled and honored when he asked me to design the cover. 

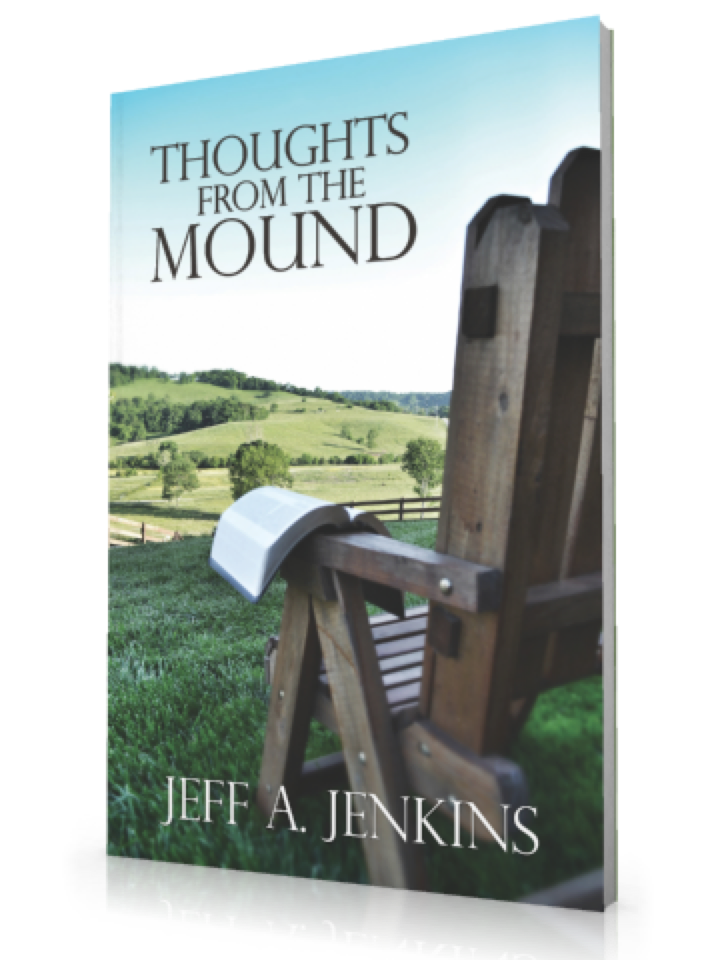
He wanted something simple, and actually used the phrase "maybe one of those comfy chairs overlooking some rolling hills." I was happy to oblige. 

Photography normally isn't my strong suit, so in order to make the cover as great as possible, I need to make technology work for me. 

I start out with sheer volume. I shot over 60 photos for the cover and picked only one. Professionals would actually shoot a lot more, perhaps hundreds of shots before settling on one that they could use. Overall, I took just over 100 total photos from about 3 different views. 

Location and time of day were extremely important as well. Whereas some photographers would be able to shoot in a variety of different types of weather, I realize that I'm not that good - neither at Photoshop or at shooting in variable weather. I wait for a clear day before I go shoot. 

The location happned to be in a church member's front yard, so it worked out for me to stay there and do what I needed to do that afternoon for as long as I needed. The chair was actually the church secretary's. The Bible on the edge of the chair was mine. 

The photos were shot using a standard 18-55mm lens on a Canon D3100. The original resolution was 4608 x 3072 and I shot in RAW+JPEG format. There are lots of benefits to shooting in RAW that I won't go into, but basically you shoot with all the data available to you to edit later. Much larger photos in size, but you get all that data to work with. This is a great thing especially if you know you're going to take something into Photoshop. 

I took a variety of shots stooping, sitting, and standing. I didn't fiddle with light settings too much at all, and I let the camera and its auto-focus do most of the work. 

One of my fallacies in shooting photography is to want to compose the actual cover in my shot while I'm shooting. What I mean by that is I'm trying to frame the cover and make it look like the final product while I'm shooting. You're not supposed to do this, but I did anyways. Given the fact that I only had one lens, I pretty much had to. 

I wanted to compose the cover with the chair facing what would be the spine of the book. I don't know if this a rule or not, but it seems to be a good one. 

After shooting the photos I take them into Photoshop. This is where the transformation begins. I make sure to set my canvas to the appropriate size and resolution (in this case 5.5 inches wide by 8.5 inches tall, CMYK mode for printing, at 300 dpi). After cropping to appropriate size, I first I run Unsharp Mask to make sure everything on the picture is as sharp as it can be. I then make a Levels Adjustment Layer and bring the levels on the photo up or down based on the Levels Histogram. This evens out brightness and contrast pretty well usually, and I don't have to fiddle with that anymore. 

Next is color adjustment. I really want the hills to pop and be the most significant thing you see besides the title. I make a seperate Color Adjustment Layer and slighly adjust the hills to look more green. Not too much, since they're already very green anyways. 

The next thing I focus on is the blue sky. I use the Burn tool with a pretty high brush size (usually about 200 pixels or higher) in the Midtones range with an Exposure at 50%. I have "Protect Tones" checked while doing this. I lightly touch up the top of the sky just enough but not enough to interfere with the overall look. I've already decided the title is going to go in the top left. 

I then work on the blur at the bottom right. I didn't need the blur to be obvious, I actually needed it to be subtle enough that you could ignore it. Jeff's author title will go here, so I need you to see the bottom of the chair but not be distracted by the detail of the chair. I use the Blur tool and a big brush to get the desired effect that I want. The Blur tool will layer on top of the effect you just made, so making the blur on top of another blur will just intensify that blur. I make sure the blur is most intense at the corner and work out. 

Titling comes last. I used the font PerpetuaTitlingMT Light and varied the sizes in the title to make sure it was a well-designed layout. Simple and effective. I place a very subtle Drop Shadow under the text (about 4 pixels distance). 

After saving into a variety of formats (PNG, JPEG, PDF) I send it to Michael. Cover is done. 

So I hope you've enjoyed this step-by-step process for designing a book cover. I'd designed covers before, but never for a publication and never with my own photography. I think it turned out pretty great. 

The Long Road With iOS
iphone 1.jpg

Ask anyone that knows me and they'll say I'm an Apple fanboy. For those of you not familiar with the term, Apple fanboy refers to an individual who thinks, most of the time, that Apple can do no wrong. That they make the best computers and devices. That their OS versions both on the Mac and iOS are the best you can get.

People that think of me as an Apple fanboy are thinking of me the wrong way. You see, I'm not a blind Apple fan. I'm a fan of the best. And up to this point, Apple has been the best. You can't argue with their hardware design. You can't argue with the customer experience that they give in their stores. You can't argue against OSX, small in marketshare but incredibly meaningful desktop operating system that surpasses Windows in design, usability, stability and performance. Not in compatibility, mind you, especially with Office, but you get the point. 

So it may come as a surprise to you that I would be writing an article that's critical of Apple today. 

Because, in my opinion, Apple no longer has the best mobile operating system. 

It has been a long road with iOS. One that didn't have many curves and dips, but it certainly has had its detours. I had the original iPhone in 2007, sans App Store. That's right - no multitasking, no copy and paste, and no App Store. The App Store, released a year after the original iPhone with the iPhone 3G, was revolutionary and set the precedent for all impostors to follow. 

While iOS (then called iPhone OS) looked revolutionary in 2007, and it certainly was, now it just looks dated. The grid of icons is old. The lack of widgets and other dynamic icons is just wrong. While I understand the reasons why Apple has stayed with the same basic design (the only redesign coming with last year's iOS 7), I don't agree with them. Apple wants the pure, simple experience for customers, and if you look at some of the Android fragmentation out there, you might say they're definitely doing the right thing. But now I'm not so sure. 

I had my yearly flirt with Android a couple of weeks ago. This time I decided to take a dive off the deep end and get a mobile phone instead of just another 7-inch tablet. I wanted to know how long it would last, and if I would stick with the device in pocket being on Android or if I would crawl my way back to my iPhone in shame. I decided on the Moto X. 

Let's back up before I talk about my latest Android experience and talk about my first. In early 2011, I actually won a Samsung Galaxy Tab (7-inch, 1st-gen model) in a contest. The experience was terrible. It was running Android 2.2. It was still called the Android Market back then. App purchases were clunky and had to be routed through Paypal. The UI on the device itself was abysmal. It wasn't a bad form factor though, and I sincerely hoped Apple would have a 7-inch tablet soon. I sold it only after a few months. 

My second foray into Android lasted only 12 hours. My cell contract was up, it was time to upgrade from my iPhone 4 where the Home button no longer worked, and I was in love with the Galaxy S3. So I got one. The next day I took it back and ordered an iPhone 5. There wasn't anything neccessarily bad about the S3, it was just not iOS. And that bothered me severely, because I had purchased apps that were iOS-exclusive that I loved. 

So back to a few weeks ago, I found out that you can, in fact, purchase any phone you wanted to provided it worked on your specific network and activate it with no charge. So I found a great price on a Moto X and met the guy and bought it. And I loved it. 

I loved the active notifications on the screen. I loved the fact that all I had to do was take it out of my pocket and it would show me the timw without pushing buttons. I loved the bigger screen, even though it wasn't 1080p. I loved the curved back on the phone, so unlike the designs of the iPhone in recent years. Most of all, I loved the fact that almost every single app I used on iOS now had a Android counterpart. 

There was only one problem: nearly everyone I know is on iOS. 

And that causes problems. iMessage for one. iMessage never worked correctly while I was using the Moto X. It would still forward Messages sent to me to my iPhone if it was on WiFi. Even after deactivating my devices on Apple.com, disconnecting each of them in Settings, it still didn't solve the problem. 

Ordinarily, I would tell people to just get over it and get used to me being off iMessage and on Android. But that's complex when you're a youth minister and all your kids are on iOS. And their parents. 

And, oddly enough, I found that working with text on the Moto X (and in turn, Android) was frustrating. I work with lots of text. I transfer lots of text. I take lots of notes on everything. So being able to copy and paste and place words in sentences was really important. And it was just clunky on Android, even running 4.4 KItKat. 

So the tension mounted, and I crawled back to my iPhone. And I'm not happy. 

If you look at how far Android has come since its introduction in 2008 (let alone just the last few years), you'll be astounded. It's like you're not looking at the same OS. iOS, on the other hand, looks almost the same. Sure, there's under-the-hood changes, and iOS 7 introduced some useful new features, but it isn't stable. It crashes with me, on average, twice a day. The UI choices in iOS 7 (like text-borderless buttons) leave something to be desired. And some of the icons look awful. 

What I would love is a fusion of the two. The cleaness of iOS (which Android has really nicely gotten clean on Nexus devices), and the flexibility and openness of Android to run things like widgets, skins, and other stuff. 

Maybe this is just me lamenting a first-world problem with a mobile phone OS that I use every day. Maybe it's time for Apple to change direction and introduce some really snazzy stuff in the next iteration of iOS. Because right now, I think Android has a leg up in choice, overall usability, and customization. If those things are important to you, you might want to take a long look at Android before you stay on the road with iOS. 

Tech Resolution #3: Backup Your Stuff
backup.jpg

Ten or fifteen years ago, you could have gotten away with not backing up your computer. Digital photos and great smartphone cameras we're quite common yet, we still used paper for things, and with the exception of a few things, our lives weren't yet totally on our computers. Fast-forward 15 years, and here we are with portable computers in our pockets. We have thousands upon thousands of digital photos and videos. We communicate through email and messaging. We live on social networks. 

And very few of us back all that data up. 

One out of every two computer users (which is pretty much everyone) will have a negative computer event in their lives every year. That could mean a computer crashing, a hard drive failing, or some natural disaster like flood or fire taking out your digital devices. 

The cardinal rule with backups is three backups on every machine - two on-site and one off. That means you need to have a backup, a backup for your backup, and an off-site backup (either on another HD at another physical location or through a service online like Crashplan). 

But most of us won't do it, because we're too busy to do it and too lazy to figure it out. And one day, it will cost you. 

Don't let 2014 be the year that you lost everything. 

With the cheapness of hard drives these days (even ultra-fast Solid State Drives are coming way down in price) you can get a lot of storage for not a lot of money. 

First, identify your needs. If you're a grandparent and have a bunch of documents to keep up with, but not a lot of photos or videos, then you probably don't need a Drobo storage array with 10 terabytes of storage. If, on the other hand, you're like me and you have small children and a wife that documents their every move, then you may need a 2 terabyte drive to backup all those photos and videos. Those are things you can't get back. 

Determine the size of your computer and devices. If you have a 500 gigabyte HD on your main laptop or desktop at home, using an external hard drive to store your photos isn't considered a backup. You need those files somewhere else. Make copies of all your important stuff (documents, photos, videos) and have them on a separate HD that you update on a regular basis, like every week. Keep that HD in a waterproof and fireproof safe for extra security. 

Utilize off-site services. All of my documents are stored in Dropbox because I have referred enough people to the service that I have ample storage space for project files, Photoshop documents, Word and Excel files, and other things. I know that my computer could be absolutely destroyed and I could fire up Dropbox on another computer and my files would be there. But I don't ever trust services fully either - I make a copy of my Dropbox folder to an external HD every month on top of my weekly backups. As far as photos and videos, you need a copy of those on an external HD, but you can also utilize services like Flickr and Shutterfly as an off-site backup for your photos and YouTube and Vimeo for videos. One bit of advice on that: don't use new services. Only use services that have been established. You don't want to put all your eggs into one basket and have that service go bankrupt or fail. Just ask users of Everpix what I'm talking about. 

Make it happen. Write it on the calendar, put a note on the fridge - do whatever you have to do to make a regular backup of your computers and devices. Most devices will back up to your computer and then you can, in turn, restore them from that backup. Most HDs offer plug-and-play features to where you can just plug the HD in and it does its thing to make a full backup. And if you can't figure it out, find someone who can or watch a YouTube video about it. 

Again, don't let 2014 be "that year we lost all our family photos." 

Back up. Today. 

Tech Resolution #2: Stop Using the Same Passwords

Just stop it. 

Everyone does it, so don't pretend that you don't. Even if your password is really good (like 7 letters and 7 random numbers like my go-to password), STOP USING THE SAME PASSWORD FOR EVERYTHING. Here's why. 

1pw.png

If someone were to break into one of your accounts - say, your email - they would literally have access to everything. Bank accounts, credit cards, Amazon, eBay, and then even more stuff like your iCloud or Google Play account, where they could wipe your phone or even your computer. There are two things that you can do today to make it exponentially harder for someone to compromise your digital life. 

1. Use two-factor (or two-step) authentication. Google and Apple both now offer 2FA as a way for you to add an extra layer of security to your accounts. Basically, it works like this: you must have a a device on an account that you physically have access to and when someone unauthorized requests access, you must approve it. Google Authenticator is the app for this (iOS, Google Play) and Apple will let you enable this over Apple.com in your iCloud account. 

2. Use an app. This may be the better and easier solution of the two, and you may not even want to fiddle with 2FA. There are a few apps that allow you to generate and save unique passwords for all your accounts, and keeps them safely encyrpted either on their own servers or on your own Dropbox. The app I love for this is 1Password. Their apps are a little pricey, but so worth it when you think about what you could lose if your accounts are compromised. Right now, for my four main accounts (Google, Apple, Twitter, Facebook) I have four 16-digit random passwords. And 1Password keeps track of all of them with a really great app. All I need to remember is my 1Password Master password and I'm set. LastPass is very good too and does a lot of the same things. Both apps have Safari and Chrome extentions. 

So, in 2014, resolved to NOT use the same passwords for everything. Because if you do, you're asking for lots of trouble. 

Tech Resolution #1: Take Charge of Your Photos
Pile_of_Photographs.jpg

One of the disasters in my tech life is photos. Not neccessarily my own, but my wife's. My wife takes at least 15 photos and 3 videos a day of our little son, and that's about to get much worse with the arrival of baby number two in April. My wife loves iPhoto, but with a library approaching 25,000 photos (and topping 75 gigs with videos) iPhoto isn't stable enough to work with. What I've proposed to her (and what I've started using currently) is a three-pronged approach for management and a system for backups. 

The first application I use is Dropbox. Now before you say "I don't have enough room on my Dropbox," listen to me for a second. Dropbox is great for having a backup of important files and access to them on lots of devices, but it's not a repository for big files like photos and videos. Dropbox does have a dandy photo upload feature you can enable within the app (both on Mac and Windows), and you can use that to download your photos from your devices, whether it's an Android phone, iPhone, or SD card from your DSLR. Your photos don't have to stay within your Dropbox folder - in fact, I'd recommend you move them promptly because you'll run out of space fast

This photo-upload feature has its advantages. One, you can categorize your photos and videos based on event titles or by day/month in folders. Two, you can pick, choose, delete, and clean out as you import. Three, all your photos go to the same place. Four, you can move photos around easily, and move them to your favorite editing program or social network. 

The Loom Mac app lives in your Menubar. 

The Loom Mac app lives in your Menubar. 

The second prong in that management approach for photos is an app called Loom. Loom is relatively new but I've come to love it in the past few months. They have beautiful apps for iPhone and iPad, as well as for the Mac. That being said, the free plan is only 5GB. For me, 5GB is plenty, because I'm not using Loom as a dump app for all my photos. I'm carefully pruning my collections and keeping my most important photos in this app, and so it acts as a backup as well. 

As far as backups are concerned, you still need one (or two) no matter what apps you use. 

I sat in a nice hotel room in Gatlinburg, Tennesee a few years ago while at Polishing the Pulpit consoling my wife because she was trying to clear up space on her Mac and ended up deleting her entire photo library (12,000+ photos at the time). I resolved right then and there that if I wasn't going to organize and manage them, that at least I would have reliable backup. 

The obvious backup is to make a copy on an external hard drive. But that can't be your only backup, because what if something happens in your home like a fire? Or robbery? Thousands of photos - gone. 

What's important is to have an off-site backup. Whether that's on a server, through Amazon S3, all your photos backed up to an app or through Google (or even Facebook - eck!), it's incredibly important to have some redundancy. Hard drives can fail, natural disasters can happen. 

I use Flickr, oddly enough, for my off-site backup. Flickr offeres 1TB (that's right, 1000 gigs) of storage for your photos. They limit you to 200 photos per set though, so plan accordingly. They don't have an iPad, Mac, or PC app yet, but they do have Android and iOS apps that are pretty good. You can make all your albums private so people won't see them, but this is a great way to just dump all your photos in full resolution into a service that tied to Yahoo and probably not going away any time soon. 

There are lots of different ways to manage photos, but one of your tech resolutions for 2014 should be to manage them in a better way. What ways have you used successfully?